Sunday, September 3, 2017

Two Minis Painted: The Puppet and The Tire

Hi friends!

Today, I have two painted miniatures to share with you:  The Puppet from Spectre Ops and The Tire from Lobotomy.  First, in some detail, a layer by layer run through of The Puppet from Spectre Ops.I know that this is nothing new, but I always like to think about the amount of different layers that go into a model.  I sometimes think I'm a slow painter.  It takes me several nights to paint a single model.  I see these speed demons, and don't know how to do it!  Kudos to them for sure though, because a game with all of the models painted is always amazing and truly impressive to see.  I feel better for the other people I talk to who spend the same amount of time on a single model as I do:  several hours.  This first model is for them.

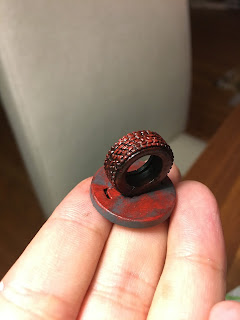
After that, I will show you The Tire from Lobotomy.  I'm not sure yet how I feel about Lobotomy's game play, but I want to play again because I find the theme so appealing and the models so beautiful, albeit frightening.  Maybe it's better to say that they are incredibly detailed and original.  Artistically incredibly well done.  I picked the easiest model I could think of, and speed painted it with incredible veracity.  Even getting frustrated when the paint wouldn't dry quick enough--very much similar to my friend who was painting so many models in such a short amount of time.  The second model is clearly for them.

I hope you all enjoy!  And please, I am open to suggestions for improving my technique on future models.  Growth mindset always!  Please just be kind with your comments.  I am actually quite proud of these.  They represent a lot of growth in my skill over the seven years painting.  Yes, I really was that bad when I started.  A friend once told me that my models looked like gummy people.  The paint went on too thick and washed out all the details.  I didn't wash or dry brush or highlight.  I made no effort whatsoever to paint the eyes or pupils.  They are gummy people.  But I will never repaint them because I am proud of them, and they represent a step--the first step--in my skill level growth.


So without further adieu, from Spectre Ops, The Puppet!


First, here he is with just the base coating.  This is the most tedious step to me.  It's like hyper competitive color by numbers.  


Next a layer of blue ink over the white to create a sci-fi glow that matches his character card, and some Nulin Oil over the metal to give it depth and shadow.  Sometimes I'll use Earthshade if I want the metal to look dirty, such as on a knight or something like that.  The Puppet is an elite technology in my head.  Clean and new.  No dirt.


Finally, some dry brushing and highlighting on the raised metal parts.  I also tightened up the blue space on his forehead.  Then some touch-up washing on the places I was a little over zealous with my dry brushing.  The model has it's clear coat and is drying now!


Onto The Tire from Lobotomy!


Black for the tire and grey for the base.  Then dry brushing a blood splatter pattern with a red paint, followed by a dry brushing with Blood for The Blood God for the wet look.  Single night, incredibly quick paint job.


There you have it!  I'll be back soon with my just-completed dice trays!

Tuesday, August 15, 2017

Tracking Plays

Hello again!  Long time no see!

There's some great apps out there for tracking board game plays and wins, but for my own personal purposes, I decided to create this spreadsheet to track the plays and wins of the games within my own gaming group here in Eugene, OR.  I'm sure that it will be a constant work in progress, but being the data junkie I am, I look forward to keeping it updated.

I decided to create this spreadsheet on the advice of my friend Becky.  I was saying how bummed I am to see so many of my games sitting on the shelf unplayed.  Apparently there are some people in the Reddit community who have made it their goal to play all of their games during a one year period.  I loved this, and as a group we decided to make it a reality.

In addition to tracking plays and checking off the list of games as we try frantically play them all, I think the spreadsheet will really help me to decide if and when I want to sell games online or in a gamer garage sale.  There's always the "I didn't like this game" reason for selling it, but it takes a little extra to really say, "Wow, I guess I never play that game.  Do I want to play it?  Should I try to incorporate it more in the rotation?  Or, is it just time for that game to move on to its next happy owner?"

Coming up (if I don't fall off of writing this again), I am hoping to be making an insert for my favorite game, Blood Rage, as well as writing a few more reviews and recaps of other games.  I've also got a cyberpunk RPG in the works, so stay tuned for a thread dedicated to that and our play-throughs!

Until then!

Monday, August 8, 2016

DnD Castle Ravenloft Insert

Hello!

I'm very late posting this, but here is the final in my run of four game inserts.  I plan on making more soon, but my recent move means that I no longer have access to tools like I did before.  As I build up my own collection of woodworking equipment, and slowly expand my horizons into other projects, I will also continue to make inserts.  To be frank though, I have no idea when that will be.  For the moment, let us content ourselves with this.

For the Dungeons and Dragons Castle Ravenloft board game I used almost the exact same design as Temple of Elemental Evil.  I've talked to some people who suggest keeping two of these DnD adventure games in one box to cut down on storage space.  I chose not to do this because I have plenty of shelf space, and because I thought it would be best to not present the opportunity to accidentally mix dungeon tiles or cards.  Characters, on the other hand, will definitely be mixed, and very much on purpose!

Considering that this was the second insert of similar design, it almost goes without saying that I learned something from my first experience.  To be fair, the only things that I can really point out are that I got much better at measuring and that I figured out how to hold the pieces together better while the glue dried.  On the matter of the former, the old saying "measure twice, cut once," definitely holds true.  However, experience is also very important.  The more I cut this wood, the more I get used to the saw blade and working with its width.  Cutting a board is like erasing a quarter inch strip from it, and where that quarter inch disappears from is very important.  On the matter of gluing, I would say that it would be worthwhile to invest in a set of clamps for projects like this.  I made due with some blocks of wood I found in my garage, but I think for next time I would like to be better prepared.

On reflection, although I said before that Elmer's glue works, I think that I will look into some other inexpensive options.  Although the glue does generally hold fine, I've already broken off two pieces of the Temple of Elemental Evil insert just by moving the cards in and out.  Although an easy fix, it was definitely an annoyance.

All that being said, here are the photos!


The original insert (used to design the new insert that would fit sleeved cards).


Blocks to hold the insert while the glue dries.


All done!

Wednesday, June 29, 2016

Game Insert #3: DC Deck Building Game Rivals

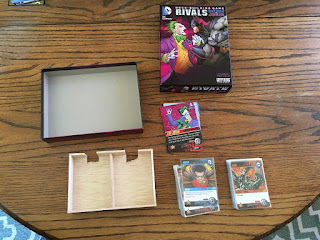
For my third insert, I chose something very simple.  I wanted a way to keep the cards easily separated into starters and master deck.  It wasn't very difficult.  Just a simple thing with two spots that would fit standard sleeved cards laying down.  I still thought it worthwhile to plan it out.


I wanted to have the cut outs on the bottom board so that it would be easier to grab the cards.  Unfortunately, drawing something on paper is not as easy as making it in real life, and my go-to carpenter roommate was off at work.  I decided to use the miter saw to cut out the pieces.  A good enough plan in that it made cut outs.  Unfortunately, they weren't pretty and circular like I had in the drawing, and also unfortunately, my first piece snapped in the saw.


My second attempt was far more acceptable.  Or, at the very least, passable.


After that, it was as easy as fitting on the sides or walls.  Having the base made this ten times easier, and ensured that the corners were right angles.


Best part, everything fit perfectly!


And, even though I didn't plan it this way, the large cards also fit inside of the little insert, right on top of the starter cards.

Monday, June 27, 2016

Game Insert #2: Dungeons and Dragons Temple of Elemental Evil Board Game

Wow, what a long title!  Well, I'll tell you what, I am on a roll with these inserts now!  I've now made four!  I'll write a short post with pictures about each in the order I made them.

For this game, I decided to mostly copy the original insert.  It was already a good design, but it just needed slightly more space.  (Forgive me showing this comparative picture so early.  It kind of spoils the ending,)  I just changed it so that the cards and tiles would sit vertically instead of laying flat.


This time I decided to go in with a plan.  I measured the compartments in the original insert and drew out a basic design on engineering paper (the best kind of paper if you weren't already aware).  There were still some adjustments that had to be made on the fly, but hey, this is a learn as I go kind of thing!  I hadn't considered the width of the pieces of wood.  I novice mistake to be sure, but an important one.  Though I was using balsa wood that is only 1/8" thick, all those 1/8"s add up.  Especially in something this small.  I also learned to be very careful when cutting things to consider the width of the saw blade and only cut one piece at a time so that those saw blade lengths wouldn't add up and leave me with a board that was far too short.


I also thought ahead and marked the boards before I glued them, so that when I was lining up the other pieces they would already have a nice spot lined out.  I'm not sure how professionals mark things like this, but I used little arrows to indicate which side of the line the new piece would fit.


Since Temple of Elemental Evil is such a bigger game, I ran into some issues holding the boards together while gluing.  The first six pieces were the hardest.


After that I used some wood blocks for braces and a scrap piece of balsa to spread the center two pieces.  This made the gluing far more simple.


When it was all said and done, everything fit perfectly!


Next up, DC Deck Building Game Rivals!

Sunday, June 26, 2016

5 Short Game Reviews from Last Night

Hi everyone (all 9 of you who checked out my last post but will probably never check back to see this...)!

Saturday night is my current gaming group's regular night to play.  That will likely be changing soon since I am moving to a different state, but, alas, that is a story for another time.  Last night we had a group of five, and played five games:  Abyss, Sushi Go Party!, Roll for the Galaxy, Bang! The Dice Game, and Ghost Stories.  I'm going to give a short review and play synopsis of each game.

Let's start at the beginning.  When the first four of us arrived, we decided to play something quick and fun while we waited for our fifth.  A personal favorite of mine, and a game that we haven't played for quite some time, is Abyss.  I'm not the best at describing what kind of game this is (but I suppose I should work on that if I'm going to continue to write this gaming blog).  The most accurate way I can describe it is as a layered purchasing game with an incredible underwater theme.  Essentially the game plays buy purchasing small cards using pearls as currency.  These small cards are color coded and have different values which allow the player to purchase larger cards.  The larger cards have special abilities, and award the player the points needed to win the game.  Maybe not the best description, but let me say that it is easy to pick up, incredibly fun, relatively short, and has some absolutely astounding artwork.  Like I said, it is one of my favorites, and I would highly recommend it to any gamer, casual or serious.

Our game of Abyss was really great!  I started off with an early lead, choosing to recruit mostly farmer lords for their high point value.  I didn't get a lot of special abilities or keys (another purchasing layer I forgot to mention earlier), but my strategy did seem to get into the head of at least one of my opponents.  Another player, new to the game, tried a strategy I'd never thought of before.  She collected several of the small cards with large purchase value, and then made several purchases at the end of the game all at once--kind of a come out from behind approach.  It didn't work out for her this game, but I do wonder if it could work if she tried it again after a little more experience with the game.  In the end, one of my opponents ended up beating me, but only by a few points.  He had the advantage of having two very good key tiles.  A close and exciting game!

Near the end of Abyss our fifth player showed up.  We talked a bit about what game we would like to play next, but I was persistent and really wanted to play one that I'd just purchased a couple of days earlier:  Sushi Go Party!  I had also just made a custom DIY box organizer for it that I wanted to show off.  All of us except for our fifth player had played the original Sushi Go, so it was very smooth sailing getting that going.  Sushi Go! is a very simple drafting (pick and pass) game.  Each player has a hand of cards with various types of sushi worth varying points.  Some cards only work in combos, so they can be risky, but they are worth more points than the cards that can be played alone.  Sushi Go! is incredibly quick, easy to play, and highly addictive.  The cards even sport absolutely adorable cartoon sushi characters!

The newest version, Sushi Go Party! isn't an expansion, but I wish that it were.  Instead, Gamewright decided to release a new version of the game that contained everything that the original had, but then add to it.  That's great for new players, but annoying for those of us who already owned the original game.  The new additions to the game are awesome though, and I can't say that I in anyway regret my purchasing it.  Instead of one deck of cards that is used for every game, Party allows players to mix and match a variety of different rolls, appitizers, specials, and deserts for each game they play.  This adds a little bit of time to the set up and tear down of the game, so if you're looking for something to play on the go or at a restaurant, brewery, etc., I would suggest the orginal game.  If you are a fan of the original and are looking for some more variety, or if the idea of an ever-so-slightly-more complex game seems more appealing, Sushi Go Party! is for you.  A couple of other advantages to party are the cool game board for tracking points, the fact that it can be played by 8 people (as compared to 6) so it's great for a large group, and the super adorable soy sauce (or maybe sake) bottle movers!

Our game of Sushi Go Party! was fairly uneventful.  We chose to play one of the suggested decks for players who wanted to see what was new for the Party version.  We were a little disappointed during set up because it only contained a few new cards (I think we would have almost preferred all new cards), but we still had a lot of fun with it.  Our late arrival ended up destroying the rest of us in points.

At that point, I would have liked to play another round of Sushi Go Party! but I was outvoted.  That's ok though, because our next game was another favorite of mine:  Roll for the Galaxy.  This is another game that I feel unable to describe in too much detail, so I will try to keep it simple.  Roll for the Galaxy is a dice building game (like a deck building game, but with a cup of dice).  If you've ever played Quarriors, the idea is similar in principal, but Roll is far more complicated, requiring way more strategy, and, in my opinion, about a million times better.  Oh, and it's space themed which I love.

Sometimes it's hard to pick a strategy for roll for the galaxy.  You have to work both with what your dice are giving you, and what tiles you have.  I found my strategy, and I think it was solid, but it was a little too late in the game.  I was able to easily color match goods and ships to earn a lot of point through consuming products from my worlds.  If I would have committed to this early enough, I think I could have kept a solid lead over my opponents and win early.  Unfortunately, one of my opponents had a similar strategy, was able to get more points per shipped product, committed slightly earlier, and had some great tile combos.  Our scores didn't end up being very close, but I maintain that I had a solid, winning strategy and that I could have won.  Oh well.  Again, I was interested in another game of Roll, but my opponent who won Abyss was distressed and refused to play again.  He often falls victim to not building a strategy quick enough, and has unfortunately cultivated a self-defeating attitude about Roll.

Next, we tried Bang! The Dice Game.  Only two of the five of us had played before, so it was a learning experience for most of us.  Bang! is incredibly silly and involves rolling dice Yahtzee style, pressing your luck, and trying to determine the secret identities of the other players.  The Western theme, although maybe borderline racist, is very fun, and we spent most of our three games laughing.

I'm not sure yet if I can give a solid review, thumbs up or thumbs down if you will, of Bang! The Dice Game.  Although I had a lot of fun playing, it seemed to be very luck based, which is not really my style of game.  Furthermore, on the third game, I was the sheriff.  The sheriff's job is to seek out and kill the outlaws, usually easily identified because they are shooting the sheriff (the only known identity in the game).  That plan goes kaput though when my deputy (whose identity is secret, but goal is in alignment) chooses to shoot me the first round of the game.  She said she was trying to through off the scent so that the others wouldn't know she was the deputy.  Well, it worked.  I spent the entirety of the game trying to eliminate her.  This is my biggest issue with secret identity games, and why I can't stand Avalon.  My success in the game is dependent on the actions that other's take.  One misstep, and suddenly everything is thrown out of whack.  That may be appealing to some, but for me it's only frustrating.  I will absolutely play another game though, and determine for certain how I feel, one way or the other.

After Bang! our fifth player who arrived late decided that he needed to leave early.  With four players left, we decided to finish out the night with a great cooperative game, Ghost Stories.  Another super fun game with great artwork, Ghost Stories may be one of the most difficult cooperative games out there.  I like to describe it as medieval Chinese ghost busters.  Essentially, each player controls a Taoist with a special ability, and together they fight ghosts and incarnations of the Wu Feng (devil).  There are cards and dice and tokens and miniatures--everything a gamer loves.  The game play is relatively straightforward.  Experienced gamers pick it up very quickly, and newcomers learn it within a few rounds.

Like I said though, the game is very difficult.  Players are able to "set" the difficulty level by deciding how many incarnations of the Wu Fang to fight and how many life points, or Qi, each player starts with.  We chose 3 incarnations (normal mode) and 4 Qi (easy mode).  We didn't even make it passed the first incarnation.  Oh well.  Still a great game that I would play many more times over.

All-in-all, it was a great night, and I look forward to the next!

Friday, June 24, 2016

Sushi Go Party! DIY Insert


Tonight I endeavored to create something.  While I am a huge fan of making things, I can't say that I'm incredibly skilled or experience in such things.  Tonight's goal was to make a game insert (similar to something Broken Token makes) out of balsa wood for Sushi Go Party! (my most recent board game purchase).

First, some background:  I sleeve all of my games.  And yes, I really do mean all of them.  The problem with that being that once a game is sleeved, it rarely fits nicely back into the original box.  I'm not sure why board game companies don't plan for this.  I would guess that a fairly high percentage of serious gamers sleeve their stuff.  Or, at best, I can say that almost everyone in my gaming circles do.

So, once a game is sleeved, what is a gamer to do?  We have only a handful of options:  One, buy a Broken Token insert.  These products are expertly made, fairly easy to assemble, and work very well.  The issue?  They cost around $35.  That's a hefty price to pay, even for a $100 game.  Option two, organize all of the cards in a variety of deck boxes.  I've definitely done that a few times.  This works well, but let's face the truth, it's not nearly as cool as an insert.  Option three--or at least the only other option I saw--make my own insert!  So that's what I did.  Here's how it went:


(This is how I originally packaged the game.  What a mess!)

I started out with the basic idea.  I chose this game because it was new and should be fairly simple.  My roommate, Chris, is a carpenter and therefore very good at this kind of stuff.  I asked for his help and tools several times throughout the process, starting with his Dremel tool.  The one he had didn't have a cutting blade, but he said a drill bit should work fine.


I measured the tin's dimension's and decided that I wanted to have a divider run halfway down the length.  On each side of the divider, there would be little tilted slots for the copies of each card.  I was also hoping that there would be enough leftover space to also fit the soy sauce bottle movers (so cute!) and the cardboard item tiles.

I got to work measuring and marking the pieces I would need.  I had purchased several pieces of 3"x24"x1/8" balsa wood.  Of course, not planning ahead, I hadn't thought to get any thinner strips,  My plan would require 1" pieces.  Oh well, not to worry, I would just cut the larger pieces down!

Well, I immediately ran into problems.  The balsa was incredibly squirrelly under the Dremel.  I couldn't cut a straight line, and--incredibly--the first drill bit I used overheated and broke.  It was time to ask Chris for help.  I said I wished I had a table miter saw.  I thought it would make things much easier.  Fortune have it that Chris just so happened to have such a tool.  A portable one that he kept in his trailer.  That ought to make things easier!

From there, cutting the lengths of the pieces I needed was easy.  Obtaining the 1" width was still an issue though.  The miter saw seemed hell bent on splitting the little pieces of balsa wood, not to mention the fact that holding something 1" wide next to a spinning saw blade is terrifying.  Back to Chris!  "Just use a table saw," he says.  Well of course!  Did he have one of those?  You know it!  Chris to the rescue again!

My plan called for many 1" strips to divide the cards.  There are 23 different cards in Sushi Go Party! so I decided that I would need 25 strips (including the sandwiching pieces).  Once I had all of these little buggers cut out though, I realized that there was no way I was going to fit all of them on the little cross section that was supposed to go down the middle of the box.  That's when I decided that I would instead just make four little pockets.  That way I could still keep the cards somewhat organized, and the tiles would have their own space.


Elmer's glue works fine for balsa wood.  I gave each side about a half hour to set up.


I did run into one little spacing problem.  Being such an amateur at this, I hadn't thought enough about the 1/8" thickness of the wood.  The little space for the tiles (top right in the picture above) had to be adjusted.  That's why it looks extra crooked.

While the glue for that skeleton set, I took a larger piece of balsa wood I had leftover from an old college project and made a holder for the little soy sauce bottles by using a large drill bit.  A drill press would have been nice to get the holes perfectly straight up and down, and all the same depth, but sometimes you just have to work with what you have.  It get's the job done!


This last piece attached easiest of all.


Now, the moment of truth.  Would it fit in the tin?  The curved lips made me a little concerned.  I worried that I had made it too big and I wouldn't be able to get it in.  Fortunately, with a little wiggling and flexing, it all fit fine!


It may not look super pretty, but it definitely gets the job done!

There are definitely a few things I learned from this process.  First, I will definitely go into my next project with a much more solid plan.  I'd say make a sketch of what you want before you just jump in.  That will keep you organized and help you to purchase the correct amount of materials.  I ended this project with a full extra piece of balsa wood.

Second, I would actually leave a little more room for the cards next time.  I measured the stacks before I made the slots, bit I think an extra quarter inch or so in both directions would make it easier to fit the cards in.  As is, I have to wiggle mine quite a bit to get them in.  The tiles however work fine.

Would I do this again?  You bet ya!  Was it worth the time and money?  I think so!  I put a lot of effort into this, but when it's all said and done, it only took one evening.  Now I have something that I created instead of purchasing, and I take pride in that (even if it isn't the most aesthetically pleasing thing ever made).  For me, that's enough to make this whole process worthwhile.  Oh, and I'm the cheapest human alive, so I'll put a lot of time into something that saves me a few bucks!